Write a handler
Make a game split-screen with Nucleus Co-op: check that it can be done, run it twice by hand, write the handler from a template, restrict the inputs, connect the copies and test it.
On this page
- 1. Check that it can be done
- 2. Run the game twice by hand
- A mutex
- The executable name or the window title
- Another Windows user
- A launcher or a store
- 3. Connect the copies
- 4. Write the handler
- The essential lines
- How each copy is made
- Per-player paths
- 5. Focus
- 6. Give each copy its controller
- 7. Size and place the windows
- 8. Options for the players
- 9. Test it in Nucleus Co-op
- 10. Share it
This guide follows the way experienced authors work: first prove by hand that the game can run twice and connect to itself, then write a handler that does it for every player. You need a little JavaScript, a lot of patience, and the game.
1. Check that it can be done
Look the game up on PCGamingWiki: it lists the multiplayer modes, the input methods and the known quirks of most PC games.
Connectivity. The copies have to connect to each other:
- LAN multiplayer works as it is.
- Online through Steam: Nucleus Co-op ships the Goldberg emulator, which replaces Steam's network layer so the copies find each other locally. The game must use Steamworks for multiplayer, not its own servers.
- Online through Epic or GOG: Nemirtingas' emulators do the same.
- No multiplayer: look for a community multiplayer mod. Without one, the game can't be split.
Input. Each copy must answer to one player only:
- XInput controllers (Xbox-type, used by most modern games) are the easiest to restrict.
- DirectInput controllers (older games) have fewer methods, which don't always work.
- Keyboards and mice for several players go through Proto Input.
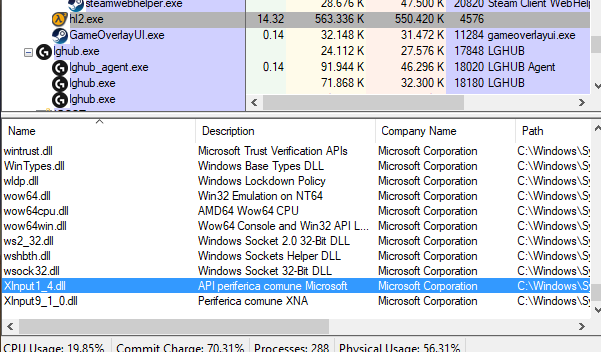
To see which libraries a game loads, open Process Explorer,
select the game process and press Ctrl+D: xinput1_3.dll, xinput1_4.dll or
xinput9_1_0.dll mean XInput; dinput8.dll or dinput.dll mean DirectInput.
2. Run the game twice by hand
Work on a copy of the game folder for these tests, and start the game twice. If the second copy refuses to start, these are the usual reasons, and some games need several of these fixes at once.
A mutex
Most games create a named mutex (or event, or semaphore) at start and quit if it already exists. In Process
Explorer, run as administrator, select the game process and press Ctrl+H to list its handles.
Look for a Mutant with the game or engine name in it (Source games use hl2_singleton_mutex), right-click it,
Close Handle, and start a second copy. Some games need several closed.
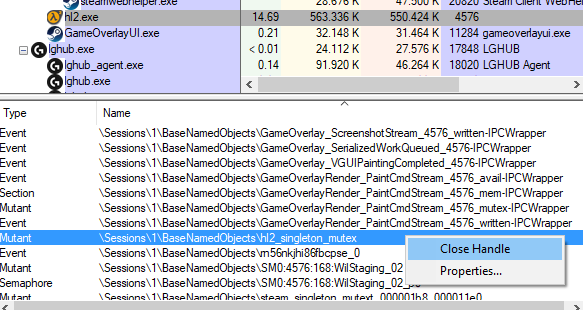
In a handler: Game.KillMutex = ["hl2_singleton_mutex"];
The executable name or the window title
Some games look for another process with the same name, or a window with the same title. Rename the executable of the second copy, or change its window title (NirSoft's WinExplorer can do it, as administrator).
In a handler: Game.ChangeExe = true; or Game.IdInWindowTitle = true;
Another Windows user
A few games only allow one copy per Windows user. Test with a second Windows account: Shift+right-click the executable, Run as different user.
In a handler: Game.LaunchAsDifferentUsers = true; (Nucleus must run as administrator; players then run as nucleusplayer1, nucleusplayer2…)
A launcher or a store
Launchers often refuse a second game. Goldberg hides the copies from Steam; for other launchers, start the game's executable directly if it allows it.
3. Connect the copies
With two copies running, check that they see each other. For a LAN game, host in one and look for the game in the
other's LAN menu. For a Steam game, Goldberg must be set up in each copy with a different Steam ID and nickname:
the easiest is to let Nucleus do it (Game.UseGoldberg = true;) and test with a first handler.
4. Write the handler
Create handlers\<Game name>.js in your Nucleus Co-op folder. Start from a handler of a similar game, or from
handlers\MasterHandler.js, the commented template that ships with the app. A minimal handler looks like this:
Game.GameName = "My Game";            // shown in Nucleus
Game.ExecutableName = "MyGame.exe";   // the game's executable, used to add the game and to follow its process
Game.GUID = "My Game";                // folder name under content\ (letters and spaces only)
Game.SteamID = "123456";              // from the Steam store or steamdb.info
Game.MaxPlayers = 4;                  // shown in the app and on the hub
Game.MaxPlayersOneMonitor = 4;

Game.SymlinkGame = true;              // each copy links to the original files instead of copying them
Game.SymlinkExe = false;              // ...but gets its own copy of the executable
Game.KillMutex = ["MyGame_Mutex"];    // closed before the next copy starts
Game.HandlerInterval = 100;           // update tick in ms, keep it
Game.PauseBetweenStarts = 20;         // seconds between two copies

Game.UseGoldberg = true;              // Steam emulator: each copy gets its own Steam ID and nickname
Game.Hook.ForceFocusWindowName = "My Game"; // the exact window title, needed to place the window

Game.Play = function () {
  // Runs once per player, before that player's copy starts.
  Context.StartArguments = " -windowed -noborder -width " + Context.Width + " -height " + Context.Height;
};
The essential lines
| Line | What it does |
|---|---|
Game.ExecutableName | The executable, with its extension. Nucleus uses it to add the game and to follow its process |
Game.GUID | Name of the folder under content\ where the copies are prepared |
Game.GameName | The game's name in Nucleus Co-op |
Game.MaxPlayers | The most players the handler supports (shown, not enforced) |
Game.BinariesFolder | Subfolder of the executable, relative to the game's root, when it isn't at the root |
Game.LauncherExe, Game.LauncherTitle | For games that must start through a launcher |
Game.SteamID | The game's Steam app id, when it's on Steam |
How each copy is made
By default each player gets a folder under content\<GUID>\ that links to the original files (SymlinkGame), so
copies take almost no space. When a file must differ per player, or a game refuses links:
| Line | Use it for |
|---|---|
Game.FileSymlinkExclusions | Files the handler replaces or writes per copy (steam_api.dll, config files) |
Game.FileSymlinkCopyInstead | Files that must be real copies, not links |
Game.DirSymlinkExclusions | Folders to create for real (their files are still linked) |
Game.KeepSymLinkOnExit | Keep the copies after the session, to inspect them while testing |
Per-player paths
Games save and read settings in your user folder. To give each player their own:
| Line | Effect |
|---|---|
Game.UseNucleusEnvironment = true | Each copy gets its own user folders (AppData…) under C:\Users\<you>\NucleusCoop |
Game.UserProfileConfigPath, Game.UserProfileSavePath | Where the game keeps settings and saves, relative to the user folder. Enables the per-player Open/Delete entries of Game options |
Game.DocumentsConfigPath, Game.DocumentsSavePath | The same for games that use Documents |
In Game.Play, Context.EnvironmentPlayer and Context.DocumentsPlayer give the current player's folders.
5. Focus
Windows lets only one window be active, and many games stop reading input or pause in the background. Every copy has to believe it's the active window:
| Line | When |
|---|---|
Game.Hook.ForceFocus = true with Game.Hook.ForceFocusWindowName | The classic method (x86 games, with the custom XInput library) |
Game.HookFocus = true | Hooks the functions a game uses to check focus. Try it when sound plays in one window only |
Game.FakeFocus = true | Sends focus messages to every window at regular intervals. Try it when only one copy takes input |
Game.PreventWindowDeactivation = true | Blocks the "you lost focus" message. Alternative to FakeFocus, blocks keyboard and mouse |
Game.SetForegroundWindowElsewhere = true | When only one copy runs at full speed with controllers |
Game.HookInit = true | Hooks the functions some games use to detect a second copy, when only the first one starts |
Game.HasDynamicWindowTitle = true | The title changes during the game: match only the start of ForceFocusWindowName |
Handlers that use Proto Input use its focus hooks and focus message loop instead.
6. Give each copy its controller
Pick one restriction method, and turn the others off.
| Method | Lines | Notes |
|---|---|---|
| Nucleus' custom XInput library | Game.Hook.CustomDllEnabled = true; Game.Hook.XInputNames = ["xinput1_3.dll"]; | The default. Name the XInput DLLs the game loads |
| XInput Plus | Game.Hook.CustomDllEnabled = false; Game.XInputPlusDll = ["xinput1_3.dll"]; | Up to 4 controllers. Add dinput8.dll to give XInput pads to a DirectInput game |
| Proto Input | Game.ProtoInput.XinputHook = true; Game.ProtoInput.UseOpenXinput = true; | Hooks at runtime, no files. Works with several keyboards and mice (Proto Input) |
| Universal Split Screen hook | Game.InjectHookXinput = true; | Redirects each copy to one controller index, creates no files |
| DevReorder (DirectInput) | Game.UseDevReorder = true; | For DirectInput controllers only |
Also useful:
Game.Hook.XInputEnabled,Game.Hook.DInputEnabled: which controllers the lobby offers for this game.Game.UseDInputBlocker = true: blocks DirectInput in the game, so players with emulated XInput controllers don't get double input.Game.SupportsKeyboard = true: one player can use the keyboard and mouse.Game.SupportsMultipleKeyboardsAndMice = true: every player can have their own, with Proto Input (keyboard and mouse options for the legacy hooks).
7. Size and place the windows
Nucleus resizes and positions each window, but the game must agree to run windowed at the size of the player's
place. In Game.Play, Context.Width, Context.Height, Context.PosX and Context.PosY give the place of the
current player. Set them through launch arguments, or by editing the game's config file:
Game.Play = function () {
  // Launch arguments
  Context.StartArguments = " -windowed -noborder -w " + Context.Width + " -h " + Context.Height;

  // Or an .ini file of this player's copy
  var ini = Context.GetFolder(Nucleus.Folder.InstancedGameFolder) + "\\Config\\Display.ini";
  Context.ModifySaveFile(ini, ini, Nucleus.SaveType.INI, [
    new Nucleus.IniSaveInfo("Display", "Fullscreen", "0"),
    new Nucleus.IniSaveInfo("Display", "Width", Context.Width),
    new Nucleus.IniSaveInfo("Display", "Height", Context.Height),
  ]);
};
Other helpers: Context.ReplaceLinesInTextFile, Context.FindLineNumberInTextFile, Context.WriteTextFile,
Context.ChangeXmlAttributeValue, Context.BackupFile (restored when Nucleus closes). Context.PlayerID (0 for the
first player) and Context.IsKeyboardPlayer tell you who you're preparing. They are all in the
API reference.
8. Options for the players
When the game has several ways to play (a mod or not, a game mode), ask the player in the lobby instead of shipping two handlers:
Game.AddOption("Use the multiplayer mod?", "Install the mod first, see the handler notes.", "useMod", ["No", "Yes"]);

Game.Play = function () {
  if (Context.Options["useMod"] == "Yes") {
    Context.StartArguments += " +mod coop";
  }
};
And write the notes players will read: what version of the game, how to connect the copies, what doesn't work.
Set them with Game.Description; on the hub, the handler's page has its own description too.
9. Test it in Nucleus Co-op
- Save the file in the
handlersfolder, then Settings › About › Reload handlers. - Add the game: Add a game in Your games, or let Found on this PC find it.
- Turn on Settings › General › Enable debug log, launch with two players, and read
debug-log.txtwhen something fails. The session screen shows launch errors too. - Between tests, Game options › Delete Game Content Folder gives you fresh copies.
- Game options › Open Game Handler opens the script in your editor.
Test with the inputs you claim to support, with the most players you claim, and from a clean install of the game.
10. Share it
When it works, publish it on the hub so everyone can play. Stuck? The handler authors hang out in the developers channels of the Discord: describe what you tried, search PCGamingWiki and the hub first, and share your script.
Based on the original guide by Pizzo, with contributions from Talos91, Ilyaki and the SplitScreenDreams community.